A Choice Of 4 Remote Controllers
To demonstrate the flexibility of the micro:bit, 4 different remote controllers have been developed:
-
A micro:bit gesture controller - translates micro:bit gestures into robot commands.
-
A Web Page GUI - provides 6 buttons in your browser to control the robot.
-
A tkinter GUI - provides 6 buttons on screen to control the robot.
-
A SparkFun gamer:bit push button interface.
The control protocol between the robot is consistent across all controllers, so the robot only need be flashed once to use any of the controllers.
1. GESTURE CONTROLLER
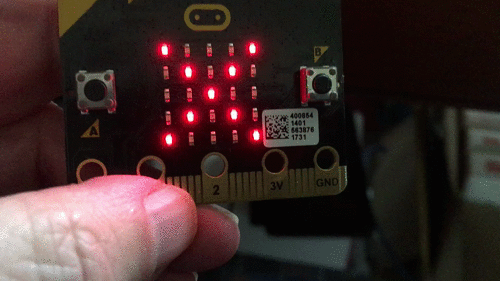
This controller consists of a standalone micro:bit. Robot motion is directed by changing the micro:bit's orientation:
-
Point the USB connector towards the floor to direct the robot to go forward.
-
Point the USB connector towards the ceiling to direct the robot to go in reverse.
-
Point Button A (without pressing it )towards the floor to direct the robot to go left.
-
Point Button A (without pressing it )towards the ceiling to direct the robot to go right.
-
Press Button A to spin left.
-
Press Button B to spin right.
-
Hold the micro:bit parallel to the floor and ceiling, and the robot stops.
To use the gesture controller, flash gesture_controller_min.py onto the controller micro:bit, and you are ready to go.
Gesture Controller Code
from microbit import *
import radio

# the last gesture detected
last_gesture = ''

def send_command(cmd):
    """
    This function sends a command to the radio.
    :param cmd: Command string
    :return:
    """
    radio.on()
    radio.send(cmd)
    sleep(100)
    radio.off()

# the main loop
while True:
    # get the current gesture
    gesture = accelerometer.current_gesture()

    # if either button is pressed, translate this to
    # a pseudo gesture
    if button_a.is_pressed():
        gesture = 'spin_left'
    if button_b.is_pressed():
        gesture = 'spin_right'

    # if this gesture is different than the last,
    # build the command string and transmit it over the radio.
    if not last_gesture == gesture:
        last_gesture = gesture
        if gesture == 'down':
            display.show(Image.ARROW_N)
            send_command('fwd')
        elif gesture == 'up':
            display.show(Image.ARROW_S)
            send_command('rev')
        elif gesture == 'left':
            display.show(Image.ARROW_W)
            send_command('left')
        elif gesture == 'right':
            display.show(Image.ARROW_E)
            send_command('right')
        elif gesture == 'spin_left':
            display.show(Image.ARROW_NW)
            send_command('spin_left')
        elif gesture == 'spin_right':
            display.show(Image.ARROW_NE)
            send_command('spin_right')
        else:
            display.show(Image.NO)
            send_command('stop')
Note that a motion control message is sent to the robot only if a new motion command is detected. This helps preserve battery life for both the controller and the robot.
Looking at the event loop, it begins by retrieving the current micro:bit gesture.
It then checks the state of Button A and Button B to see if the user wishes to spin the robot in either direction. If either of the buttons is currently pressed, the button press is translated into a "pseudo gesture" and saved. This allows the button presses to emulate the behavior of a true gesture change.
Next the current gesture is compared to the one saved from the previous cycle. If it is the same, no action is taken, but if it is different, then the appropriate motion message is sent to the robot by passing the message to the send_command function. This function turns the radio on, transmits the command and then turns the radio off. In addition, an arrow image is displayed to show the motion command detected, or an "X" is displayed if the robot is stopped.
GUI BASED CONTROLLERS
The GUI based controllers each consist of 2 components. The first component is a Python script that runs on a PC and connects to the controller micro:bit via the serial/USB cable. There are separate Python scripts for each of the GUI controllers, that is the Web based GUI and tkinter based GUI. These scripts detect GUI button press events, and when an event change is detected, it sends a serial message to the micro:bit. The micro:bit translates these serial messages into radio commands and transmits those to the robot.

The gui_radio_bridge
As described above, the gui_radio_bridge translates serial messages generated by the GUI scripts into radio messages.
It needs to be flashed onto the controller micro:bit before either of the PC GUI scripts can run.
To flash the gui_radio_bridge, just copy the code from gui_radio_bridge_min.py to your favorite micro:bit editor and flash it.
The gui_radio_bridge Code.
from microbit import *
import radio

while True:
    # get data from serial link
    data = uart.readline()
    sleep(8)
    if data:
        # send data out over the radio
        cmd = str(data, 'utf-8').rstrip()
        radio.on()
        radio.send(cmd)
        radio.off()
The code for this script is very simple. The loop waits for an incoming line of text to be received over the serial link from the PC. When a line is received, it turns the radio on, sends the received string out via the radio interface, and then turns the radio off.
2. THE WEB PAGE GUI CONTROLLER
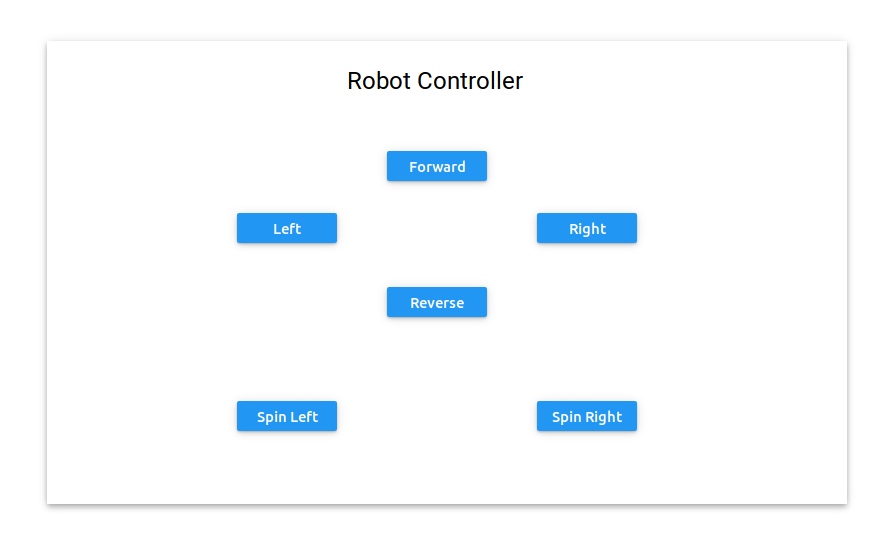
The remi GUI Builder
The GUI Web page shown above, was created using a drag and drop editing tool included with the remi GUI builder. Click on the remi link to the left if you are interested in learning how to use remi to create interactive web pages in pure Python. The editor not only allows you to layout the web page, but it generates the code for the page as well, including stubs for any desired GUI events, such as button clicks. If you prefer to code directly in Python without the aid of the editor, the remi API is succinct and easy to understand.
The GUI and its associated web server are run on a PC, and it connects to a micro:bit via a serial USB link. The code running on the controller micro:bit is the gui_radio_bridge. The bridge translates the serial commands coming from the GUI to micro:bit radio messages.
Before running this GUI, you will need to install remi on your PC, so please follow the installation instructions on the remi GitHub home page.
I cannot emphasize enough how easily remi makes generating Web based GUIs. You don't have to know any HTML, CSS or JavaScript and can modify the page in pure Python. In addition, its author provides great support if you have questions on using the tool.
Web GUI Code
As mentioned earlier, the bulk of the code for this GUI was automatically generated by the remi editor. What will be shown and described here are the added or modified sections of code. Code that was not modified, will not be shown or discussed. If you would like to see the file in its entirety, please look at web_remote_controller.py.
The entire Web GUI is encapsulated in a single Python class, called RobotController.
Modifications Or Additions To The Generated Code
__init__
In the __init__ method, two lines were added to the generated code. The added code creates variables to hold the serial com port, used to communicate with the gui_radio_bridge, and another variable to hold the instance of the serial object used to send data to the bridge.
class RobotController(App):
    def __init__(self, *args, **kwargs):
        self.com_port = None
        self.micro_bit_serial = None
        if not 'editing_mode' in kwargs.keys():
            super(RobotController, self).__init__(*args, static_file_path='./res/')
main
The main method, generated by the editor consists of a single line, that calls the ui_constructor method that instantiates all the widgets on the page. This is the last line in the code below.
The code that has been added to main performs micro:bit serial port auto-detection.
    def main(self):
        print('Autodetecting serial port. Please wait...')
        if sys.platform.startswith('darwin'):
            locations = glob.glob('/dev/tty.[usb*]*')
            locations = glob.glob('/dev/tty.[wchusb*]*') + locations
            locations.append('end')
            # for everyone else, here is a list of possible ports
        else:
            locations = ['dev/ttyACM0', '/dev/ttyACM0', '/dev/ttyACM1',
                         '/dev/ttyACM2', '/dev/ttyACM3', '/dev/ttyACM4',
                         '/dev/ttyACM5', '/dev/ttyUSB0', '/dev/ttyUSB1',
                         '/dev/ttyUSB2', '/dev/ttyUSB3', '/dev/ttyUSB4',
                         '/dev/ttyUSB5', '/dev/ttyUSB6', '/dev/ttyUSB7',
                         '/dev/ttyUSB8', '/dev/ttyUSB9',
                         '/dev/ttyUSB10',
                         '/dev/ttyS0', '/dev/ttyS1', '/dev/ttyS2',
                         '/dev/tty.usbserial', '/dev/tty.usbmodem', 'com2',
                         'com3', 'com4', 'com5', 'com6', 'com7', 'com8',
                         'com9', 'com10', 'com11', 'com12', 'com13',
                         'com14', 'com15', 'com16', 'com17', 'com18',
                         'com19', 'com20', 'com21', 'com22', 'com23', 'com24',
                         'com25', 'com26', 'com27', 'com28', 'com29', 'com30',
                         'com31', 'com32', 'com33', 'com34', 'com35', 'com36',
                         'com1', 'end'
                         ]

        detected = None
        for device in locations:
            try:
                self.micro_bit_serial = serial.Serial(port=device, baudrate=115200,
                                                      timeout=.1)
                detected = device
                break
            except serial.SerialException:
                if device == 'end':
                    print('Unable to find Serial Port, Please plug in '
                          'cable or check cable connections.')
                    detected = None
                    exit()
            except OSError:
                pass
        self.com_port = detected

        # open and close the port to flush the serial buffers
        self.micro_bit_serial.close()
        self.micro_bit_serial.open()
        time.sleep(.05)
        print('Port found: ', self.com_port)
        return RobotController.construct_ui(self)
construct_ui
This method is generated by the GUI editor and was not modified. It both instantiates all of the GUI widgets and peforms their layout on the web page.
The Event Handlers
The remi editor allows you to select events of interest for each widget, and then creates a stub method to handle each event. You just need to add the code specific to your application for that event.
Let's look at the handlers for the Forward button. Handlers for all of the other buttons are very similar.
    def onmousedown_btn_forward(self, emitter, x, y):
        print('fdown')
        self.write_to_mb('fwd')

    def onmouseup_btn_forward(self, emitter, x, y):
        print('fup')
        self.write_to_mb('stop')
There are 2 events associated with this button, that is, when the button is pressed and when it is released. The print statements were added to send debugging information to the console, and can optionally be deleted.
write_to_mb
The write_to_mb method sends the command over the serial port to the micro:bit. It is an additional method added to the RobotController class.
    def write_to_mb(self, msg):
        msg = bytes(msg.encode())
        self.micro_bit_serial.write(msg)
GUI Instantiation
The last section of the code instantiates the GUI.
configuration = {'config_project_name': 'RobotController',
                 'config_address': '0.0.0.0', 'config_port': 8081,
                 'config_multiple_instance': True,
                 'config_enable_file_cache': True,
                 'config_start_browser': True, 'config_resourcepath': './res/'}

if __name__ == "__main__":
    s = socket.socket(socket.AF_INET, socket.SOCK_DGRAM)
    # use the google dns
    s.connect(('8.8.8.8', 0))
    # start(MyApp,address='127.0.0.1', port=8081,
    #       multiple_instance=False,enable_file_cache=True,
    #       update_interval=0.1, start_browser=True)
    start(RobotController, address=s.getsockname()[0], port=configuration['config_port'],
                        multiple_instance=configuration['config_multiple_instance'],
                        enable_file_cache=configuration['config_enable_file_cache'],
                        start_browser=configuration['config_start_browser'])
Most of this code was generated by the editor. The configuration dictionary was not modified. It contains default entries that can be used when instantiating the GUI.
The default IP address for the web server is 127.0.0.0.1 as shown in the commented out start line. I wanted to be able to expose the web server to browsers on other computers, so the s.connect and s.getsockname calls allow for discovery of the IP address of the machine running the webserver. The rest of the parameters are the system defaults, and you can find out more about those on the remi GitHub page.
Running The Web Based GUI
- Flash the gui_radio_bridge on to the micro:bit acting as the remote.
- Connect the micro:bit to the computer that will run the GUI with a USB cable.
- Run web_remote_controller.py from a command or terminal window.
- Open up your web browser and use the announced httpserver URL to access the GUI. For example http://192.168.2.188:8081
   $ python3 web_remote_controller.py
        remi.server      INFO     Started websocket server 192.168.2.188:43723
        remi.server      INFO     Started httpserver http://192.168.2.188:8081/
        remi.request     INFO     built UI (path=/)
        Autodetecting serial port. Please wait...
        Port found:  /dev/ttyACM0
        remi.server.ws   INFO     connection established: ('192.168.2.188', 54508)
        remi.server.ws   INFO     handshake complete
Pressing a GUI button initiates motor movement, and releasing it stops the motors.
3. THE TKINTER GUI CONTROLLER
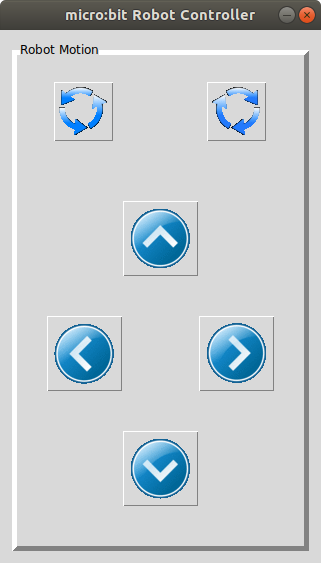
The tkinter GUI runs on a PC, and it connects to a micro:bit via a serial USB link. The code running on the micro:bit is the gui_radio_bridge. The bridge translates the serial commands coming from the GUI to micro:bit radio messages.
tk_controller Code
The code is structured similarly to the remi gui. Since tkinter programming is beyond the scope of this guide, this discussion will be limited to one of general functionality. If you wish to learn more about creating tkinter applications, I can recommend "Modern Tkinter for Busy Python Developers", by Mark Roseman as a reference.
You may refer to the actual source code by looking at tk_controller.py.
The __init__ method:
- Auto-detects the micro:bit serial port
- Initializes the tkinter framework
-
Calls the create_control_frame method.
- Create_control_frame instantiates and performs layout for all the GUI widgets
- Associates event handlers for each widget.
Event handlers are provided for each GUI event identified in create_control_frame.
Running The tkinter Based GUI
- Flash the gui_radio_bridge on to the micro:bit acting as the remote.
- Connect the micro:bit to the computer that will run the GUI using a USB cable.
- Run tk_controller.py from a command or terminal window.
python3 tk_controller.py
Pressing a button initiates robot motion and when a button is released robot motion is stopped.
4. THE GAMER:BIT CONTROLLER
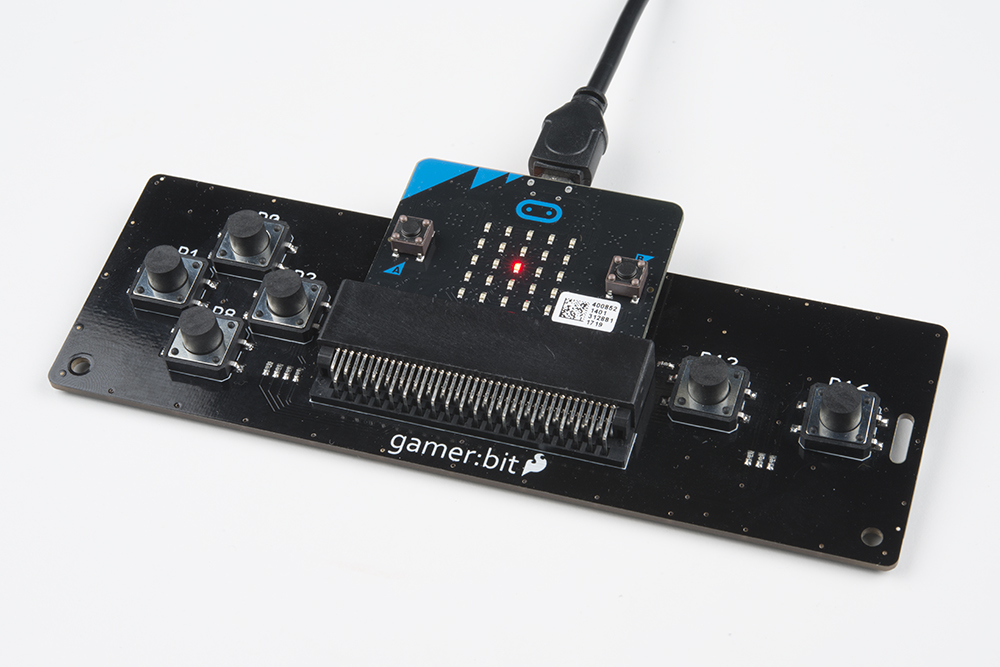
This controller requires the purchase of a SparkFun gamer:bit
The buttons on the left hand side of the gamer:bit are used to control forward, reverse, left and right motion. The buttons on the right control both left and right spinning motion.
Pressing a button initiates robot motion and when a button is released robot motion is stopped.
Gamerbit Code
The code for this controller utilizes the gamerbit third party library.
If you look at gb_remote_control.py, the gamerbit library, that is, the GamerBit class, is placed at the top of the file.
class GamerBit:
    def __init__(self, callback, scans=1):
        self.pins = [pin0, pin1, pin2, pin8, pin12, pin16, button_a, button_b]
        self.callback = callback
        self.number_of_scans = scans
        for pin in self.pins[:-2]:
            pin.set_pull(pin.PULL_UP)
        self.previous_readings = [0] * 8
        self.current_readings = [0] * 8
        self._scanner()

    def scan(self):
        readings = [int(not pin.read_digital()) for pin in self.pins[:-2]]
        readings.append(int(button_a.is_pressed()))
        readings.append(int(button_b.is_pressed()))
        self.current_readings = [int(self.current_readings[pin] or readings[pin]) for pin in range(0, len(readings))]

    def _scanner(self):
        pin_ids = ['pin0', 'pin1', 'pin2', 'pin8', 'pin12', 'pin16', 'button_a', 'button_b']
        while True:
            for scans in range(0, self.number_of_scans):
                self.scan()
            report = {}
            for x in range(0, 8):
                if self.current_readings[x] != self.previous_readings[x]:
                    report[pin_ids[x]] = self.current_readings[x]
            self.previous_readings = self.current_readings
            self.current_readings = [0] * 8
            if report:
                if self.callback:
                    self.callback(report)


def gb_callback(report):
    """
    This function is called by the GamerBit class when a button
    state change is detected. It translates the button presses
    and releases into messages that are sent over the radio
    interface and received by microbit_robot.py
    :param report: A GamerBit report dictionary
    :return:
    """
    # turn on the radio
    radio.on()
    for key in report:
        value = report[key]
        # if the button was released, send a stop command
        if value == 0:
            radio.send('stop')
            radio.send('stop')
            sleep(10)
            radio.send('stop')

        # send a command associated with each button
        else:
            if key == 'pin0':
                radio.send('fwd')
                print('fwd')
            elif key == 'pin8':
                radio.send('rev')
                print('rev')
            elif key == 'pin1':
                radio.send('left')
                print('left')
            elif key == 'pin2':
                radio.send('right')
                print('right')
            elif key == 'pin12':
                radio.send('spin_left')
                print('spin_left')
            elif key == 'pin16':
                radio.send('spin_right')
                print('spin_right')
            else:
                pass
    radio.off()


# instantiate the GamerBit class providing the callback function
gb = GamerBit(gb_callback)
As shown on the gamerbit GitHub page, the library uses a callback method provided by the user, to process any button presses on the board. The function, gb_callback()is that callback function. It translates the gamer:bit events to motor control strings and sends those strings over the micro:bit radio interface to the robot. The radio is turned on only to transmit the short command strings and then immediately turned off to preserve the battery life.
Running The Gamerbit Controller
- Using your favorite mirco:bit editor, flash gb_remote_control_min.py on to the controller micro:bit.
- Plug the micro:bit in the gamer:bit.
- Power the micro:bit either with a USB cable or attaching a battery pack.