
Second Beta Release - I2C Support
I’ve released the second beta of Telemetrix for the Raspberry Pi Pico. This release incorporates support for monitoring and controlling i2c devices. The Pico supports two i2c ports, and Telemetrix supports both.
There are three API methods supporting i2c.
The first, set_pin_mode_i2c, allows you to select which of the two i2c ports the device is attached to and the GPIO pins you assign as SDA and SCL.
Note: This method must be called before using the next two i2c methods.
The second API method, i2c_write, allows you to write a variable number of bytes to the i2c device on the specified i2c port. In addition, you may specify if the master retains control of the bus at the end of the transfer. Being able to do so is required for some i2c devices.
The last API method, i2c_read, provides a way to retrieve data from an i2c device on the specified i2c port. You specify the number of bytes to return, and you may optionally provide an i2c register used for the read. It also allows you to specify if the master retains control of the bus at the end of the transfer. You must also specify a callback function that receives the data reported by the Pico.
To summarize, the i2c support is a generalized view for controlling and monitoring i2c devices. In order to support a specific i2c device, the i2c methods listed above are used to implement control and monitoring as described in the device’s spec sheet.
Let’s take a quick look at a working example provided for interacting with the ADXL345 3-axis accelerometer.
    # setup adxl345

    # device address = 83
    my_board.set_pin_mode_i2c(0, 4, 5)
    # time.sleep(.2)

    # set up power and control register
    my_board.i2c_write(83, [45, 0])
    # time.sleep(.2)
    my_board.i2c_write(83, [45, 8])
    # time.sleep(.2)

    # set up the data format register
    my_board.i2c_write(83, [49, 8])
    # time.sleep(.5)
    my_board.i2c_write(83, [49, 3])
    # time.sleep(.1)
Here we initialize the chip. If you notice, the sleeps are commented out. With Telemetrix, you can run at full speed without having to introduce additional delays. The PICO C-SDK handles things very nicely.
    while True:
        # read 6 bytes from the data register
        try:
            my_board.i2c_read(83, 50, 6, the_callback)
            # time.sleep(.3)
        except (KeyboardInterrupt, RuntimeError):
            my_board.shutdown()
            sys.exit(0)
The code above is the main loop of the program. It requests 6 bytes, which comprise the upper and lower values for the x, y, and z axes.
Consistent with the Telemetrix philosophy, i2c reports are made available to the application via a user-supplied callback function. Callbacks are used because the application is notified as fast as possible of detected data changes on the Pico.
def the_callback(data):
"""
Data is supplied by the library.
:param data: [report_type, i2c port, Device address, device read register,
number of bytes returned, x data pair, y data pair, z data pair
time_stamp]
"""
time_stamp = data.pop()
date = time.strftime('%Y-%m-%d %H:%M:%S', time.localtime(time_stamp))
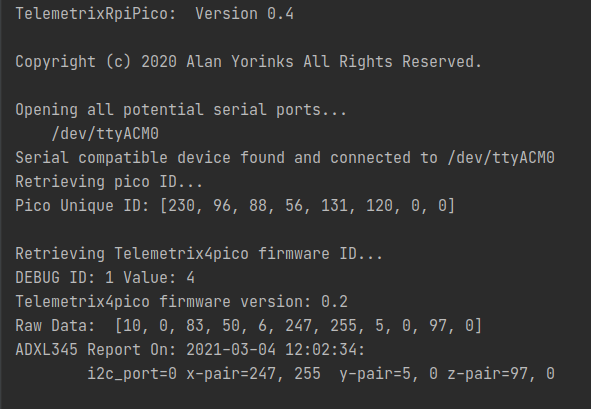
print(f'Raw Data: {data}')
print(f'ADXL345 Report On: {date}: ')
print(f'\t\ti2c_port={ data[1]} x-pair={data[5]}, '
f'{data[6]} y-pair={data[7]}, '
f'{data[8]} z-pair={data[9]}, '
f'{data[10]}')
print()
The user-provided callback function must supply a single function parameter, called data, in the example above. When Telemetrix calls your callback function, it provides a list describing the report from the Pico. A time-stamp is included for every callback to indicate the time that the event occurred.
The elements in the list are described in the API for each callback type. For i2c_read, the last line of the method description contains the description of the items in the callback list.
 def i2c_read(self, address, register, number_of_bytes, callback=None, i2c_port=0, no_stop=False)

    Read the specified number of bytes from the specified register for the i2c device.

    :param address: i2c device address

    :param register: i2c register (or None if no register selection is needed)

    :param number_of_bytes: number of bytes to be read

    :param callback: Required callback function to report i2c data as a result of read command

    :param i2c_port: 0 = port 0, 1 = port 1

    :param no_stop: If true, master retains control of the bus at the end of the transfer (no Stop is issued), and the next transfer will begin with a Restart rather than a Start.

    callback returns a data list: [I2C_READ_REPORT, i2c_port, i2c_device_address, count of data bytes, data bytes, time-stamp]
Here is sample output for the ADXL345 example. Both raw and “cooked” data are presented.
Some Thoughts On Working With The Pico C-SDK Versus The Arduino-Core
An Arduino-Core version is coming for the RP2040 chip, but no release date has been announced. That is why I am using the RP2040 native SDK.
Using an Arduino-Core is a familiar API if you have developed Arduino sketches. That may appear to be an advantage. However, things are not always consistent between implementations for the various processors. One advantage of using an Arduino-Core is that you may be able to reuse an existing Arduino library, such as support for a specific sensor or actuator. Currently, few support libraries are available for the RP2040, but that is most likely to change over time. It is not clear yet if the Arduino-Core for RP2040 will include PIO support, but I rather doubt it. Assuming I can master programming the PIO, not having access to it would be a major setback.
A major advantage of using the RP2040 C-SDK is that its documentation is excellent. Between the documentation and extensive set of Pico examples, understanding the SDK is very straightforward. And if you run into something where you need some additional help, the Raspberry Pi Forum is a wonderful resource.
I will admit that there is somewhat of a learning curve, but it is not excessively steep. I have yet to master the syntax of cmake files but have avoided having to do that by using the existing files provided with the examples.
All in all, I am pleased with the C-SDK, and when the Arduino-Core finally becomes available, I will probably continue using the C-SDK. Time will tell which becomes the predominant development paradigm.
What Comes Next
I am currently reading up on the PIO of the RP2040 to provide support for NeoPixels. NeoPixels are the next feature. I know that there are examples in existence that I probably can reuse as-is. Still, I want to understand the “magic” of the PIO processors that are an integral part of the RP2040, all in preparation for implementing my PIO libraries for devices such as the HC-SR04 distance sensor.
I am also doing some code cleanup. I am eliminating literal values and replacing them with #defines to make the code easier to read and maintain. Also, buffer storage will be defined as global so that it does not use valuable stack space. Finally, I am splitting the .c file into a .c and .h (header) file. Again this makes things simpler to understand and maintain and is aligned with standard C coding practices.
So stay tuned!