
Wrapping Up The Project With Robot Control

In this edition of Bots In Pieces, we will:
- Wrap up the Banyan Bot Blue Project
- Create the final component - the robot controller.
- Show you how to launch the application:
- From the command line
- At boot time
- Without being connected to your LAN
The Banyan Robot Controller Component
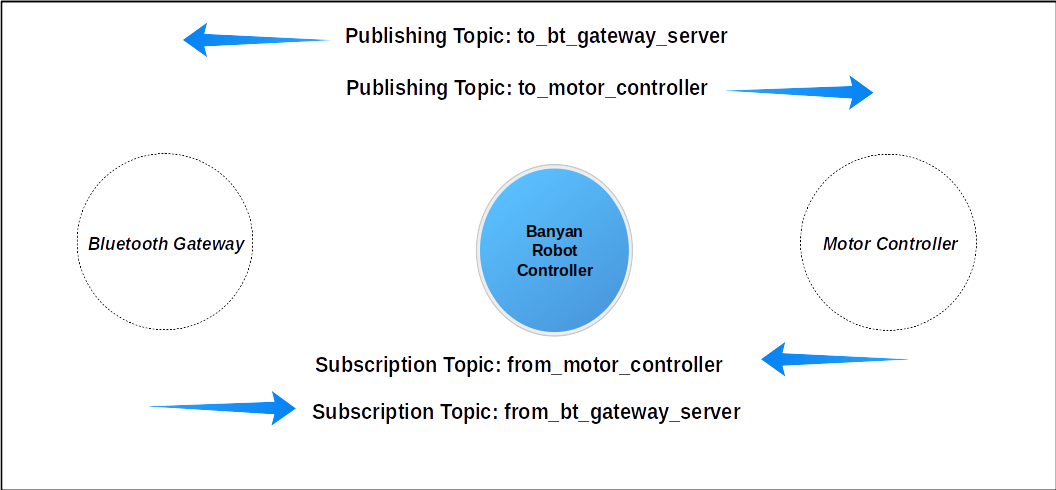
Currently, we can send and receive raw commands to and from an Android Joypad App. We also can control a robot’s 2 D.C. motors and 2 bumper switches through a Crickit HAT. What we don’t have is a way to connect the Android App to the Crickit HAT. The Banyan robot controller component provides that interconnection.
The robot controller will:
- Accept raw motor control commands generated by the Android App and translate those commands into OneGPIO control messages for the Crickit Gateway to process.
- Monitor the bumper switches and autonomously adjust the robot’s motion when the robot bumps into an object. When a bumper switch fires, the robot runs in reverse for approximately 1 second.
The Robot Controller subscribes to receive generic robot control commands. It translates and publishes those commands as OneGPIO protocol messages that the hardware control component can use to control the robot. It also subscribes to receive any report data that the hardware control component publishes, such as bumper sensor data. It uses that data to affect robot motion autonomously.
Using A Dictionary To Dispatch Processing Of The GUI Commands
The robot control component is a typical Banyan component, with one possible notable exception.
The Android App publishes user commands as single-character messages, namely, “U, u, D, d, L, l, R, r, S, s, and W, w,” as explained in a previous posting.
To determine how to process each command, we could use a long list of if/elif statements, but a more elegant approach is to place the commands in an iterable data structure that describe the motor protocol messages for each command. This data structure is named motor_control_payloads. When a command is received, a routine looks up the command and retrieves its associated motor commands.
The structure may seem complicated, but in reality, it is very straight forward. Essentially it is a list. Let’s look at an element of motor_control_payloads to understand how it works.
Each list element contains a dictionary item with the command as its key. Below is the entry for the ‘U’ command to move the robot forward. The value of the dictionary entry consists of an array of 2 OneGPIO messages, one to control the left motor and the other for the right motor.
    # forward
    {'U':
        [
            {'command': 'dc_motor_forward', 'motor': 1,
             'speed': self.forward_speed / self.speed_scaling_factor},

            {'command': 'dc_motor_forward', 'motor': 2, 'speed': self.forward_speed / self.speed_scaling_factor}
        ]
    },
Here is the code to iterate through motor_control_payloads:
    # Find the messages for the key command and publish
    # the commands to the motor controller.
    for record in range(0, len(self.motor_control_payloads)):
        if key in self.motor_control_payloads[record]:
            motor_commands = self.motor_control_payloads[record]
            payload = motor_commands[key][0]
            self.publish_payload(payload, self.publish_to_hardware_topic)
            payload2 = motor_commands[key][1]
            self.publish_payload(payload2, self.publish_to_hardware_topic)
This routine checks to see if the command is in the array:
    for record in range(0, len(self.motor_control_payloads)):
            if key in self.motor_control_payloads[record]:
If it is, it retrieves the entry for the command:
motor_commands = self.motor_control_payloads[record]
Each entry contains a list of 2 OneGPIO protocol messages for motor control. Each command is retrieved and then published.
                 payload = motor_commands[key][0]
                            self.publish_payload(payload, self.publish_to_hardware_topic)
                            payload2 = motor_commands[key][1]
                            self.publish_payload(payload2, self.publish_to_hardware_topic)
This is a lot less code to maintain then using a very long chain of if/elif statements.
Running The Application
You can run the application either from the command line or automatically start it at boot-time.
Note: There have been some changes made to some of the files since the previous posting. Please download the files once again by clicking on this link to go to the repository web page. Next, click the on the green download button and finally unzip the file. The distribution includes a .zip file that contains all the files you need to run the application. Please unzip the file called final_files.zip in your home directory.
From Command Line
Tip: If you run the Raspberry Pi in a headless mode using VNC or xrdp, you can start the application remotely without having to attach a keyboard and mouse to the Raspberry Pi resident on the robot.
To start all the components from a command shell, type the following command:
bls -f bbot.csv
Then using your Android device, connect the Android to the Raspberry Pi, and you are all set to go.
At Boot-Time
To have the application automatically start at boot time, first, change the permissions on bbot.sh contained in final_files.zip.
chmod ugo+x bbot.sh
If your home directory is something other than /home/pi, edit bbot.sh with paths to your home directory.
Next, open rc.local for editing.
NOTE: I am using vi as the editor, but use any editor you wish, and make sure to use the sudo command. Now when your Raspberry Pi boots, the Banyan-Bot-Blue application automatically starts.
sudo vi /etc/rc.local
Directly above the exit 0 line at the bottom of the file, add the following line:
/home/pi/bbot.sh
Again, adjust the path to your home directory if necessary.
A Nice Bonus - No WiFi Router Needed!
One of the features of Python Banyan is that if no WiFi is detected, all the Banyan components default to using localhost or 127.0.0.1 as the IP address. Since all of the components for Banyan-Bot-Blue reside on a single computer, they still can publish and subscribe to messages without the need of having to be connected to a WiFi network.
The Wrap Up
We covered much ground in this and the previous postings. We learned how to create, load, and pair a simple Android robot control App with the Raspberry Pi. We learned about Python Banyan and its concept of Protocol and Hardware Gateways in addition to the OneGPIO messaging specification. Hopefully, you found this series of articles, both exciting and informative.
Lessons Learned
A Disclaimer: I do not receive any components from any manufacturer either free of charge or on a trial basis. I purchase everything I use. All opinions about any of the products I use are my own. I attempt to be as objective as possible.
One lesson I learned is that I should have tested the Crickit HAT using battery power well before the conclusion of this project. The Crickit HAT is excellent for projects powered from a high current source, but when powering from 4 NiMh AA cells, as recommended by Adafruit, the batteries die within minutes.
Although not necessarily a gating factor, I believe the support libraries are somewhat lacking. The libraries do not provide a callback mechanism for input changes, forcing one to poll the inputs. Moreover, for some strange reason, when instantiating the stepper motor objects within the library, the motors are automatically powered. If you should happen to have a D.C. motor connected to the pins that support both stepper and D.C. motors, the D.C. motor is activated if you create an instance of the stepper motor object. What should be done, in my opinion, is provide a method call to power the stepper upon demand. Its initial state should be off. However, in spite of these objections, the shortcomings of the support software are not enough to prevent one from using the Crickit.
As mentioned in a previous posting, the Crickit solves physical design issues very nicely, simplifying wiring significantly. So from this point of view, I can recommend the Crickit if used with a current source that can provide 2.5 amps of continuous power.
Next Time
In the next edition of Bots-In-Pieces, we introduce the Banyan Bot Blue Too, where we exchange the Crickit Hat for a Pimoroni Explorer HAT Pro. Hopefully, the Explorer HAT fairs better when using battery power than the Crickit HAT.