
Back After A Hiatus
Once again, I have not been able to post regularly. Thankfully, I am well, and I hope the same is true for you and yours.
My excuse this time is that “I’ve been busy.”
I’ve been working on a new Pymata client called pymata4 and a Firmata based client for the RoboHAT MM1 and a Scratch extension for the RoboHAT board. Lately, I have been working on GUI for the RoboHAT and thought I would share my discovery of a great GUI building tool.
Some Thoughts About Creating GUIs
As a programmer, after crafting and then completing an interactive GUI, there is no better feeling than sitting back, admiring my visual masterpiece, and thinking to myself, “Job well done.” And then I think, “Man, was that ever painful.”
Let’s face it, GUI programming is often tedious and time-consuming. No matter which GUI library you pick, getting the visual aspects “just right” can be an infuriating experience. Coding up the logic that interacts with the GUI widgets is usually quick and straightforward, but not so for getting those pesky widgets looking “just right.”
To aid in getting those visual aesthetics correct, modern GUI libraries include geometry managers to assist in laying out the widgets on the screen. The Python tkinter library includes 3 such geometry managers, namely, the place, pack, and grid managers. ZetCode describes these follows:
“The place geometry manager positions widgets using absolute positioning. The pack geometry manager organizes widgets in horizontal and vertical boxes. The grid geometry manager places widgets in a two-dimensional grid. “
Why am I discussing tkinter when there is so much else to choose from? The answers are relatively simple – it is already bundled with Python, and I have used it in the past.
When reading tutorials on creating GUIs, you are usually strongly discouraged from using the place geometry manager since it requires you to know the absolute x and y coordinates for each GUI widget on the screen. Both the pack and grid managers use algorithms built into their code to perform screen placement. Essentially, you just instantiate a GUI widget, associate it with the manager, and you are done. Auto-magically, things are placed correctly for you. No-fuss, no muss. Well, that’s the theory. In reality, the correct placement is close, but to get things to look like you may wish, a lot of “minor” tweaking is required to get everything to look “just right.”
When I go to create a GUI, I usually use the grid manager to do my placement and then spend the next several weeks doing the tweaking. I don’t know about you, but I would rather be coding than tweaking. For me, this is not time well spent.
For my latest GUI endeavor, I wanted to see if a WYSIWYG (What You See Is What You Get)
design tool exists for tkinter. With WYSIWIG,
you drag and place the widgets visually on the screen, thereby saving some time and frustration.
The tool then generates the code that instantiates and positions the widgets on the screen.
The tool should also have the ability to create the stubs for the GUI events.
If I could find such a tool, I thought the entire GUI experience might be enjoyable and not just
at its completion.
The good news is, I found such a tool, and its name is Page. The bad news, well, there is no bad news.
Page uses the place layout manager, so what you see is truly what you get, without having to go back and tweak things.
Before getting into a discussion about Page, let me point out that you still need to understand tkinter programming. There is no getting around that. I have used “Modern Tkinter For Busy Programmers” as a learning guide that clearly and succinctly gets to the point. There is also a free online version if you prefer.
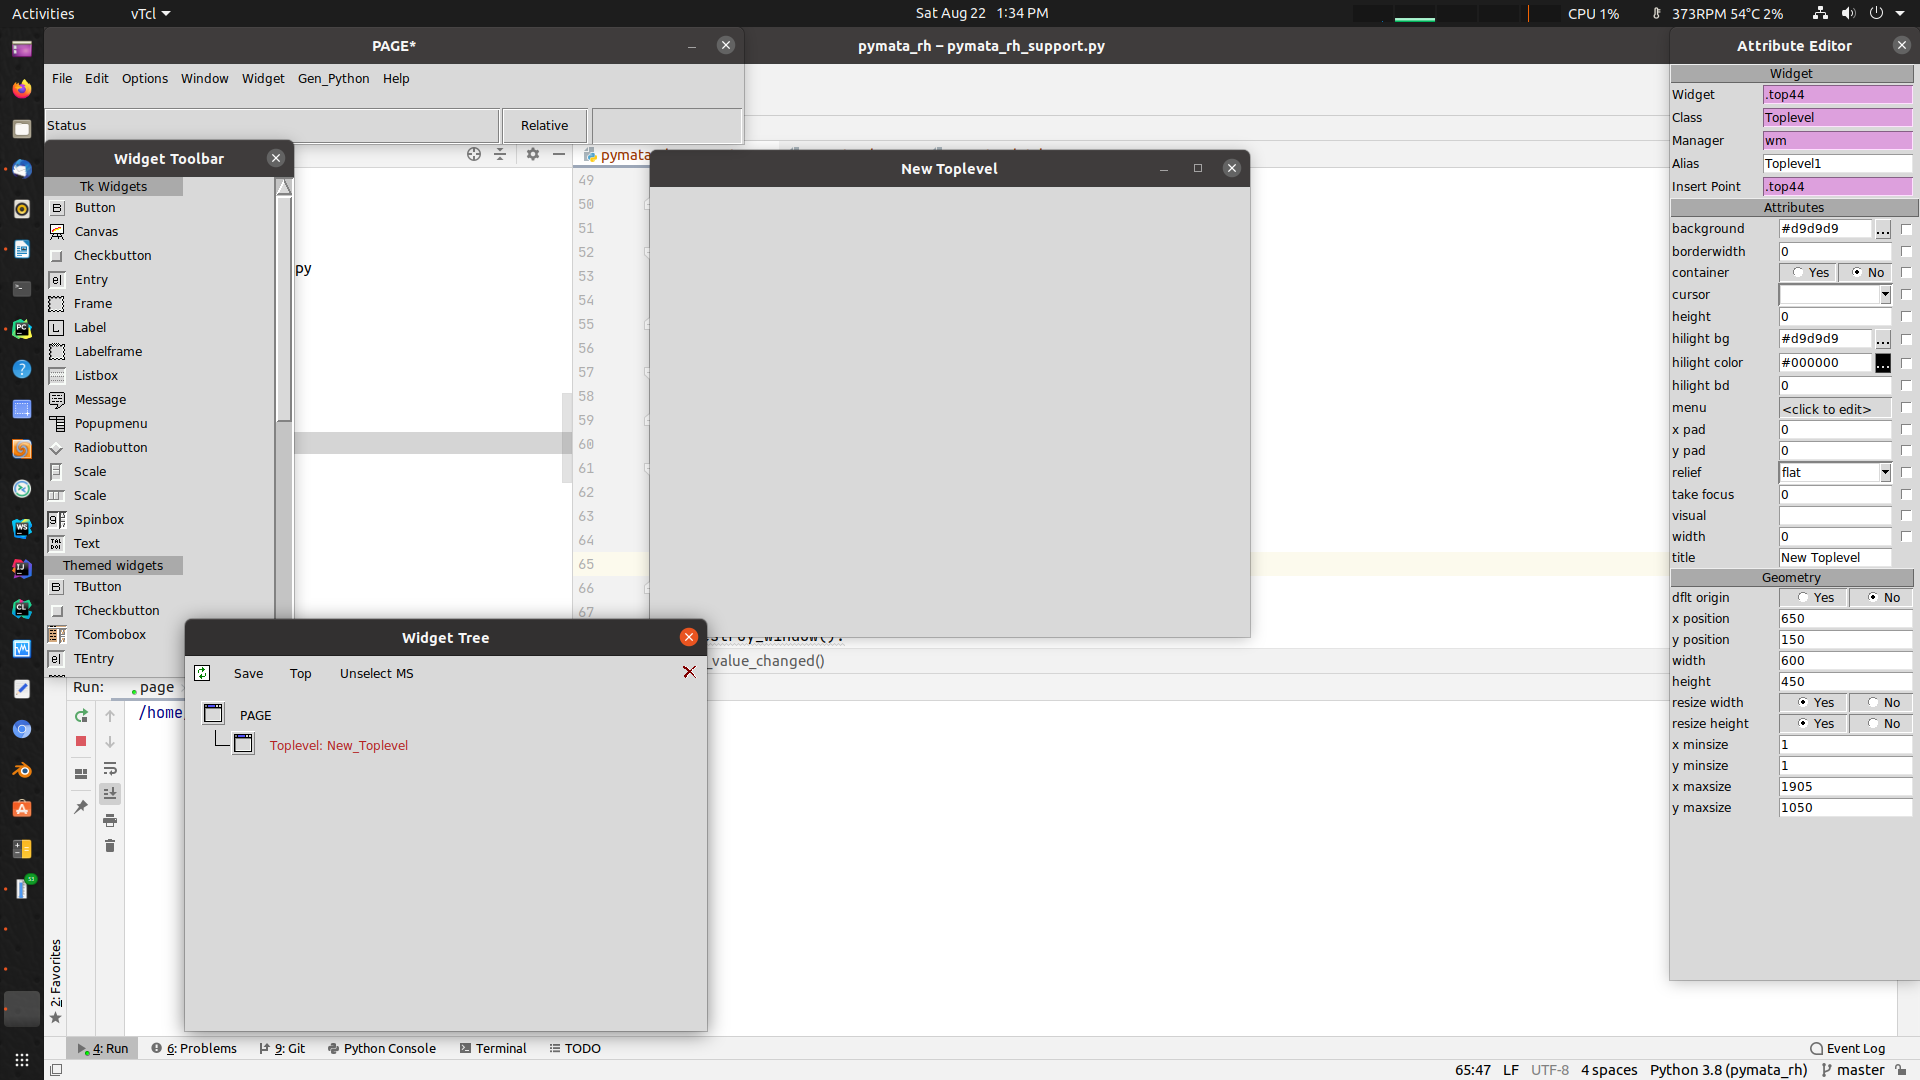
In the screenshot above, you can see Page ready to start a new project. Page displays its main menu, a Widget Toolbar, where you select the widget you wish to use. A Toplevel window, where you place the widgets, an Attribute editor will enable you to quickly modify the widget’s attributes and a Widget Tree that allows you to quickly find a widget you’ve added to the project.
I am not going to spend much time here explaining the details of how to use Page. The Page documentation is extensive and does that very well.
Instead, let me show what I accomplished in under an hour with Page.
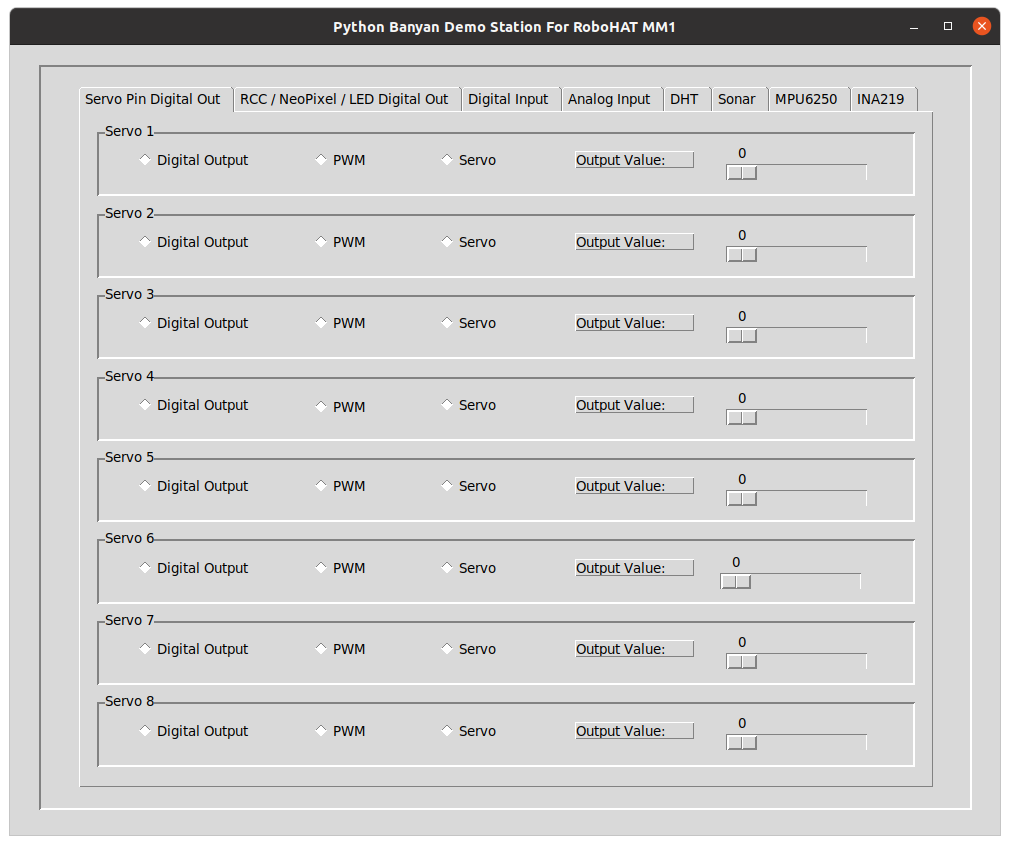
Subsequently, I finished laying out all the tabs for the GUI in under 4 hours!
The purpose of this GUI is to control the GPIO pins and the RoboHAT MM1 controller’s various devices. The screenshot above is that of the first tab of that GUI. This screen allows a user to select a digital output pin mode for all eight RoboHAT “Servo” pins.
Once a pin mode is selected, the user may set the pin’s output value by using the slider widget.
Because Page has a cut and paste feature, it was trivial to recreate all of the widgets for all 8 pins.
After laying out all the widgets, all of the tkinter code, including the event stubs, was created with just 2 clicks of the mouse.
Page has another really nice feature. It separates out the GUI generation code from that of the event stubs. That means you can independently update the GUI and only generate new stub code when you need to. It will even merge the new stub code with the existing code so that you don’t lose your changes.
If you are interested in creating a tkinter GUI for your project, you should seriously consider using Page. The author, Don Rozenberg, supports this project, and IMHO goes above and beyond what most open source developers do. One last thing - make sure that you install ActiveState ActiveTcl as recommended in Page’s documentation. Initially, I didn’t, and it caused some issues when using Linux.